Python
ChatGPT
CV Golf Ball Tracer
I got the idea for this project from watching various Youtube golf channels. The ball tracers shown on the videos would be a huge effort to add in, and to automate tracer drawing in Python using CV libraries could be a fun project. I watched a few tutorials on CV libraries and it became obvious this was beyond my Python understanding so I turned to ChatGPT for some inspiration.
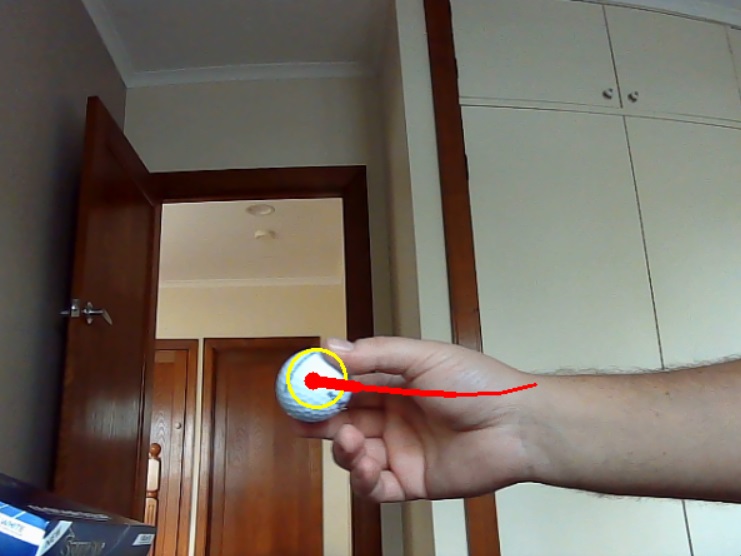
ChatGPT gave me the code below. The code takes a video stream from a webcam connected to the computer and looks for golf balls within the stream. It uses what's called an HSV colour range, set within the code, to detect white coloured objects which means it would't work for golf balls that aren't white without modifying the code. This is easy to do though - see the 'whiteLower' and 'whiteUpper' variables, which hold RBG values for this colour range; the commented out values are those that ChatGPT suggested and the values used are ones I found that worked better. If the code finds circles above a certain size and within the HSV colour range, it will draw a yellow circle around the object and places a red tracer line that dissapears.
The results can be seen below. The refresh rate of the video stream was a bit choppy as I only have a cheap webcam, so I believe it would struggle to detect a full golf ball being struck at full speed. The detection also becomes worse if the ball is below a certain size in the frame, and with a camera set up at a safe distance behind someone hitting a ball, this would likely be too far to detect.

# import the necessary packages from collections import deque from imutils.video import VideoStream import numpy as np import argparse import cv2 import imutils import time # construct the argument parse and parse the arguments ap = argparse.ArgumentParser() ap.add_argument("-v", "--video", help="path to the (optional) video file") ap.add_argument("-b", "--buffer", type=int, default=64, help="max buffer size") args = vars(ap.parse_args()) # define the lower and upper boundaries of the "green" # ball in the HSV color space, then initialize the # list of tracked points #whiteLower = (0, 0, 249) #whiteUpper = (180, 255, 255) whiteLower = (48, 0, 244) whiteUpper = (166, 248, 255) pts = deque(maxlen=args["buffer"]) # if a video path was not supplied, grab the reference # to the webcam if not args.get("video", False): vs = VideoStream(src=0).start() # otherwise, grab a reference to the video file else: vs = cv2.VideoCapture(args["video"]) # allow the camera or video file to warm up time.sleep(2.0) # keep looping while True: # grab the current frame frame = vs.read() # handle the frame from VideoCapture or VideoStream frame = frame[1] if args.get("video", False) else frame # if we are viewing a video and we did not grab a frame, # then we have reached the end of the video if frame is None: break # resize the frame, blur it, and convert it to the HSV # color space frame = imutils.resize(frame, width=600) blurred = cv2.GaussianBlur(frame, (11, 11), 0) hsv = cv2.cvtColor(blurred, cv2.COLOR_BGR2HSV) # construct a mask for the color "green", then perform # a series of dilations and erosions to remove any small # blobs left in the mask mask = cv2.inRange(hsv, whiteLower, whiteUpper) mask = cv2.erode(mask, None, iterations=2) mask = cv2.dilate(mask, None, iterations=2) # find contours in the mask and initialize the current # (x, y) center of the ball cnts = cv2.findContours(mask.copy(), cv2.RETR_EXTERNAL, cv2.CHAIN_APPROX_SIMPLE) cnts = imutils.grab_contours(cnts) center = None # only proceed if at least one contour was found if len(cnts) > 0: # find the largest contour in the mask, then use # it to compute the minimum enclosing circle and # centroid c = max(cnts, key=cv2.contourArea) ((x, y), radius) = cv2.minEnclosingCircle(c) M = cv2.moments(c) center = (int(M["m10"] / M["m00"]), int(M["m01"] / M["m00"])) # only proceed if the radius meets a minimum size if radius > 5: # draw the circle and centroid on the frame, # then update the list of tracked points cv2.circle(frame, (int(x), int(y)), int(radius), (0, 255, 255), 2) cv2.circle(frame, center, 5, (0, 0, 255), -1) # update the points queue pts.appendleft(center) # loop over the set of tracked points for i in range(1, len(pts)): # if either of the tracked points are None, ignore # them if pts[i - 1] is None or pts[i] is None: continue # otherwise, compute the thickness of the line and # draw the connecting lines thickness = int(np.sqrt(args["buffer"] / float(i + 1)) * 2.5) cv2.line(frame, pts[i - 1], pts[i], (0, 0, 255), thickness) # show the frame to our screen cv2.imshow("Frame", frame) key = cv2.waitKey(1) & 0xFF # if the 'q' key is pressed, stop the loop if key == ord("q"): break # if we are not using a video file, stop the camera video stream if not args.get("video", False): vs.stop() # otherwise, release the camera else: vs.release() # close all windows cv2.destroyAllWindows()
Despite the shortcomings in the code, it was still fun to learn about CV libraries. I'm sure someone out there will be able to build on this for their own project. It also showed me how easy it is to get assistance from ChatGPT when writing code and I was very impressed that the code it produced worked right off the bat.